AKA newb’s guide to investigating an email compromise.

(Yes, I did spend 3x the amount of time making that image then I did writing the article, what about it??)
Disclaimer
This is a guide for those of you who find yourself facing this type of incident for perhaps the first time, or have limited experience. Maybe you have limited resources or have just been told to ‘do the needful’. I work for an MSP that primarily serves SMB’s and am completely self-taught, so this guide wont tell you to use any fancy tools, or be particularly sophisticated.
Also: this is not a remediation guide. You should always do your investigation after changing the user’s passwords at the very least. If the account had MFA on it, then review the methods in case any were added. I’ll publish a guide later on remediation. It is totally possible that you may find more changes to remediate during your investigation, though.
This guide will not work on GoDaddy 365 Tenants. There are too many restrictions on what you can do with them. GoDaddy support may be able to assist you with your incident.
When to get help
If you have no/limited experience in this and it’s a serious or long-reaching incident, such as a sensitive account or, god forbid, an admin account, you probably shouldn’t handle this yourself. Engage cyber insurance if you have it, or look for third-party forensics. O365 hacks are often data breaches, so it’s better to be safe than sorry and at the very least talk to a lawyer with experience in cyber incidents or data breaches.
What you need
- An admin account on the tenant. I’m not certain the exact granular permissions, so use a Global Admin to be safe.
- The Osprey PowerShell module (That I created!)
- An ipstack API key. You can try to use the free one but you’ll probably have to buy the basic one.
- Excel or another spreadsheet editor that can transform data.
Your goal
Your investigation should attempt to determine the following things:
- Initial access vector and when it started
- What changes were made to the account
- What files and/or emails were accessed
- What emails were sent
- If any other accounts in the tenant were compromised
Ready? Lets go!
Data gathering
You’ll want to first install the Osprey PowerShell module and follow it’s instructions to do a tenant and user investigation. To be safe, use the default time period of 90 days. We’ll gather 90 days of data at first to be safe. You can try to gather more if you have the licensing.
While the tenant and user investigation is running, you’ll need to export the following directly from the tenant.
Azure AD/Entra ID Portal
- All user sign-ins for 7 days or 30 days, whatever is the highest amount you have access to
- All user audit logs for 7 or 30 days
- Sign-in and audit logs for the specific user
- A screenshot of the user’s authentication methods, new experience
- A screenshot of the user’s Applications
Exchange Admin Center
- 10 day inbound and outbound message trace for the compromised user. Download it immediately.
- Queue 90 day inbound and outbound message trace. This can take some time, mind.
Security Admin Center
- UAL (Unified Audit Log) export for the user. It’s the option under Audit. Ensure it looks like this.
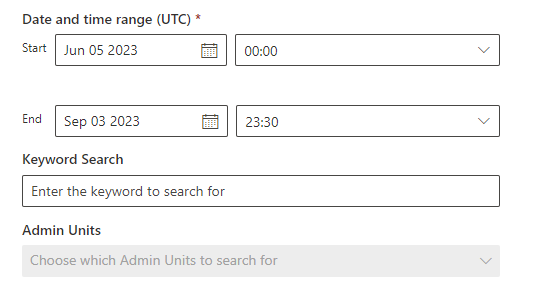
Since it exports in UTC, make sure you set the time for the day you want to investigate to as 23:30.
*If you end up with more than 50k records then you’ll need to choose a shorter time period and then just combine exports. Ensure you combine them before you transform the data!
PowerShell
If Osprey is running you’ll need to wait until it’s finished to do this. Thankfully you’ll already be connected to the modules you need to run the following command:
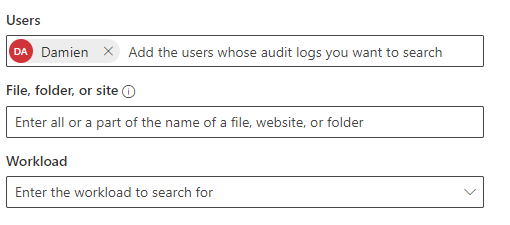
Get-Mailbox -ResultSize Unlimited | Get-MailboxPermission -User Damien | ft User,Identity,AccessRights
Obviously change Damien to the UPN of the user. This will give you any mailboxes the user has access to. You’ll want to rerun Osprey user investigation but with all of the mailboxes the user can access.
Working the Records
Once you have all the data (except the 90-day message trace, which will take a while) you need to prepare to clean up the data. Save all of your exported logs from the admin centers in one folder, then copy that folder and use the copies to clean and filter data. You can do the same with all of the Osprey logs once they finish.
Next, you’ll make a new Excel workbook and name it something like Audit or Records. Whatever you want. This will be where the cleaned-up UAL will go, as well as other records. I generally have the following tabs in my workbook: Cleaned Audit, IP Addresses, Files, Emails Accessed, and maybe Emails Sent and/or Emails Received for specific cases where the threat actor was sending or receiving specific emails.
IP Addresses
The best part of Osprey is the converted authentication logs. They’ll be within the user’s folder in Osprey. Open it up and format it as a table. Next, you’ll sort by City. For any IPs under your city or other locations that are likely fine (IP matching isn’t super accurate), you’ll need to copy all of the IP addresses (including duplicates, you can remove them later) and paste them into the Audit workbook IP Addresses tab, under the heading Good IPs. You’ll do the same with the cities where you know the access is not legitimate, but paste them under the heading Bad IPs. You can use an IP lookup tool online and see IPs that are specifically VPN’s Proxies, or Datacenters. If there are locations or IPs you aren’t certain of, make a third column for Uncertain. Use the Remove Duplicates tool under the Data menu to remove all duplicates. Now you have a bunch of IP addresses!
You can do basically the same thing with the user’s sign-in logs. Filter by location and classify the IP’s. Sometimes you will find IPs that aren’t in the CAL.
Unified Audit Log
The UAL exports in a gross format, so follow these instructions from Microsoft to clean it up into a workable format.
Another Disclaimer: This part SUCKS and it’s disgusting and manual. I am certain there are better ways to do this, but this is just how I do it right now. Eventually I wont do it this way…
Once you have the converted UAL open, you’ll want to remove a few garbage columns. You’ll primarily want the CreationDate, Operation, UserID, ClientIP, ClientInfoString, and some others. Just clear enough that all of those are on your screen. Don’t delete too much.
Next, sort the sheet by ClientIP. Now it gets fun. You’ll start to manually highlight IP addresses. If it’s an IP in your Bad IP table, highlight it with the Bad styling. Use Find and Replace if it’s easier.
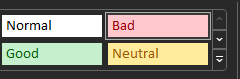
If it’s a known good IP, use the Good styling.
If it’s an IP you aren’t certain of, it’s IPv6, or it’s IP lookup matches to a Microsoft Datacenter, use the Neutral styling. If it doesn’t have anything under ClientIP, use the Neural styling as well.
If it’s an IP that’s not in your records yet, use an IP lookup tool to get an idea of it’s location, then classify as needed.
Next, sort by date, descending. Then, scroll until you see the first red highlight. This is likely your initial access date, provided it’s not close to the 90 day limit. If the initial access date is very recent, you can delete the much older records.
Next, you’ll need to classify the Neutral records. If it’s a yellow cell surrounded only by green, it’s likely fine, so change the highlighting to Good. If it’s surrounded by Red it may be bad, so highlight as such. Some SharePoint and OneDrive access will show as coming from MS Datacenter, so this is why we do it this way. Use your best guess based on context. If the red entries have never done a certain action then it’s likely non malicious.
There are a lot of entries that don’t show up as having an IP, especially these ones:

If you see these entries around red records, it’s likely a suspicious application was added. Check the user’s Applications in Azure for anything that looks strange. Examples I have seen that are malicious are PERFECTDATA SOFTWARE, eM Client, SuperMailer Sender, and App. Remove access to those suspicious apps immediately, but make sure you note down what API permissions the app has. If an app was registered within the Tenant then revoke its secrets and block access.
This is where you will also see records such as New-InboxRule. Osprey also grabs this and will show it within both the Tenant and user records. Remove the rule via OWA or PowerShell. If the rule involves specific email addresses or domains, you’ll want to specifically search for those when you get the message trace. Also, check the folder where the emails were being redirected. Often times these emails will involve fraud and you will need to take immediate action!
Finally, once you have classified all records in the UAL, filter ClientIP by red color to see all malicious activity. Entries under the SharePoint or OneDrive workload will likely be file access, so filter those down and copy any entries under ObjectId to the Files tab in the Audit workbook.
User Audit Log
You’ll need to review the user audit log, either CSV export or GUI. Highlight suspicious entries to investigate later, such as changes to authentication methods.
Osprey Exchange Mailbox Audit
I prefer how Osprey gets these records VS doing it with PowerShell. You’ll need to open up the Exchange Mailbox Audit for the user account (and eventually any delegated inboxes), convert to table, remove garbage columns, and then do the same IP highlighting trick. If your tenant doesn’t have the extended auditing that shows you MailboxItemsAccessed, then you can only see emails with attachments that were accessed. There is no way around this.
Once you have highlighted malicious IPs, you’ll remove all unneeded columns. Once it’s removed, you should have the folders, subjects, and any attachments of accessed emails. Do the same thing to delegated inboxes. Copy the records to the Audit workbook.
Message Trace
Osprey message trace isn’t the best, so you’ll need to wait for the large export unless you were lucky enough to have an access period of 10 days or less. Once the message trace is exported, you’ll do the same IP highlighting trick on the outbound trace. If you send email through a spam gateway or signature server you might be SOL though. It depends.
For inbound, highlighting won’t work. Inbound is only useful anyway to either find the phishing email that might have started it or to track emails that might have been replies to the threat actor. Move known or suspicious records for inbound and outbound to the Audit records.
If there was heavy access to delegated mailboxes then check those for inbox rules ect as well, as Osprey will show you created rules. Run similar message trace on delegated inboxes.
A Note On eDiscovery
I rarely use eDiscovery for this process. I may use it to pull emails sent between the compromised account and any attempted fraud victims during the compromise period, but I can just as easily grab those from the O365 backup service the clients have. The emails may still be in the redirected folder or be recoverable from deletion via the user’s inbox or the Exchange admin center.
Compile Your Findings
Finally, you should have roughly what was done with the account. Any malicious activity such as inbox rule creation, application consent, and SharePoint sharing link creation should have been found and remediated. Once I have all the records, I will create a document that details the following:
- How the incident was discovered
- Who it affects
- When the likely initial access was
- What activity was done on the account, in chronological order, such as:
- MFA methods added
- Applications registered or consented to
- Inbox rules created
- If emails were accessed or sent
- If SharePoint or OneDrive files were accessed
- Any other changes made
- When the account was secured and how it was secured
I have a nice Word document template I use for this, but it can be simple. Paired with the Excel workbook with file and email access it should show a good amount of information.
Check Remaining User Accounts
Remember when I told you to export all user sign-ins? This is to check the rest of the accounts. You know the drill. Format as table, filter out failed sign-ins, and then filter out known good cities. Use IP lookup tools and your brain to determine if the remaining account sign-ins are fine and then repeat this entire process for every account that is compromised. The Osprey Tenant investigation records for inbox rules are also good for seeing suspicious activity on other tenants.
Another Warning
You might find evidence of attempted or successful fraud during your investigation, such as wire transfers, or payment account changes. If you do, STOP. CEASE YOUR ACTIONS. You are not law enforcement. You could contaminate evidence if you don’t know what you are doing. Immediately escalate internally. This is why I told you to save all of your raw records in a separate location.
Especially if fraud appears to be successful, report it to the appropriate authorities and then I once again strongly encourage you to obtain legal counsel and/or third-party forensics. If you live in Alberta I can provide limited + NON-LEGAL advice on this, but outside of that, you are on your own.
Final Words
I know this isn’t how everyone investigates email compromises, but this is what works for me. Again, I work in SMB with limited tools and budget. I do the needful which I’m fine with right now. I can usually go from Incident start to RCA completion in 1.5-2.5 hours, depending on incident size. I’m currently reworking my method and tools in anticipation of an increase in audit records due to Microsoft expanding audit logging for everyone, and I’ll update this article or make a new one when that happens.
If you liked this article or found it helpful please consider sharing it. If you have any feedback or questions leave a comment, shoot me an email, or message me on LinkedIn. I also frequently help people out for free because I’m nice, so consider buying me a coffee on Ko-fi to support what I do.

(Keep that in mind so you don’t drive yourself insane and/or get sued.)